Replacing a rotting deck
This project required over half replacement of the deck substructure.
Not only is it necessary to replace a rotting deck, it’s also a chance to modernize, improve, and redesign your urban oasis.
Table of Contents
Replacing a rotting deck is a transformative process that can breathe new life into your outdoor space. By carefully planning, choosing the right materials, and executing the replacement with care, you can create a deck that not only restores functionality but also elevates the aesthetics and enjoyment of your outdoor living area. Your new deck becomes a canvas for memorable moments and a symbol of your dedication to a beautiful, well-maintained home.

Before –
Rotting Wood Deck
We started noticing holes and some soft, spongy spots in the wood deck. Rotting can compromise the structural integrity of the deck and presents a safety hazard.
There were also some warped deck boards. This can be a sign of water damage and structural instability. Warping affects the deck’s visual appeal and walking surface.
With signs of structural instability, sagging, leaning, and movement when walking on the deck, all of this was a clear indication that the deck needed to be replaced.

After –
New Composite Deck
Composite decking is virtually maintenance-free. Unlike wood, it doesn’t require regular staining, sealing, or painting. A simple periodic cleaning with soap and water is usually sufficient to keep it looking great.
Composite decking is highly durable and resistant to weather, rot, insects, and decay. It won’t splinter, crack, or warp, making it a long-lasting choice.
Composite decking has a textured, non-slip surface that provides excellent traction, even when wet. This makes it a safer choice for decks in areas prone to rain like Seattle.
While the upfront cost of composite decking may be higher than wood, the long-term savings on maintenance and replacement can make it a cost-effective choice over the life of your deck.
Time-lapse Video
This 6 minute video shows the deck replacement from start to finish.
Rotting Substructure
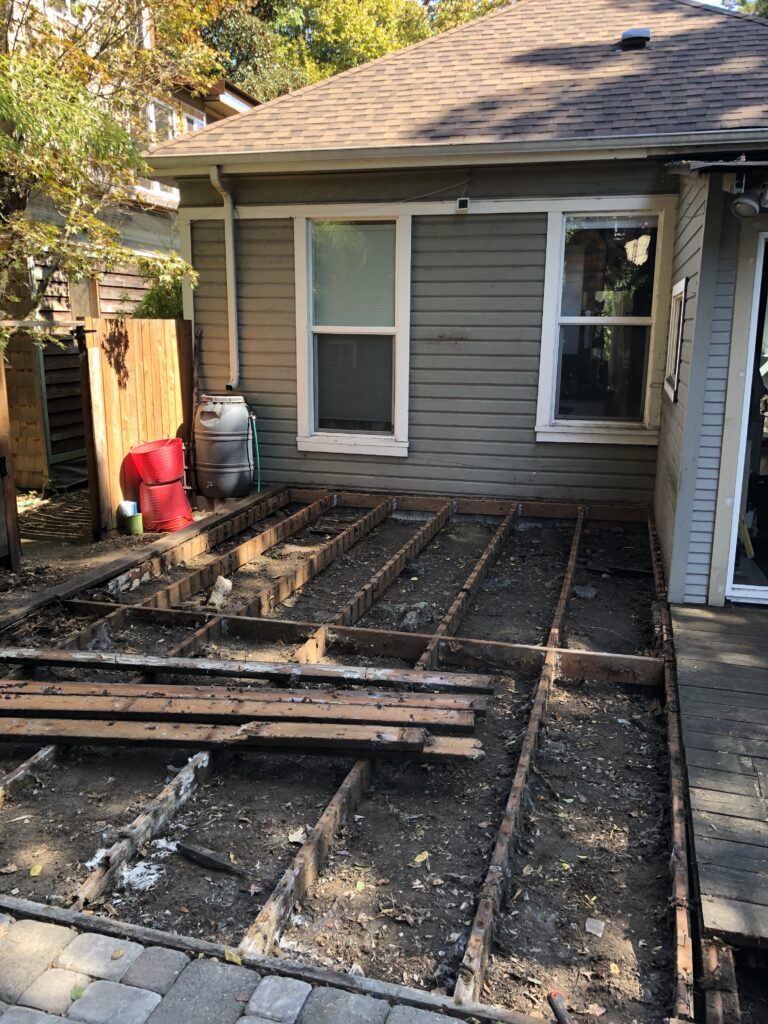
Pressure-treated boards were used for the deck substructure in direct contact with the soil. Over time in Seattle, they can succumb to the relentless forces of moisture leading to rot and structural compromise. This deterioration beneath the surface serves as a stark reminder of the importance of proper installation when building outdoor structures. Rotted substructures can jeopardize the safety and longevity of your deck to ensuring the stability and security of your urban oasis.
Rotting Substructure
Removing the surface allowed us to thoroughly inspect any issues and decide whether to replace or repair the deck.

Direct Soil Contact
Relentless Seattle rain and moisture lead to rot and structural compromise. This section need to be replaced.

Disintegration
This substructure board, buried in a perpetually rainy climate, has disintegrated entirely.

Brick Barrier
Adding a layer of bricks under the pavers will help keep soil and moisture away from the deck substructure. Using construction adhesive kept the pavers from slipping around.

Digging in the Dirt
The ground level needed to be lowered to ensure that the substructure does not have any contact with soil.

Concrete Footing
A solid foundation is essential. Leftover pieces of concrete from a deck that had been removed decades ago worked well for substructure footings.

Deck Substructure
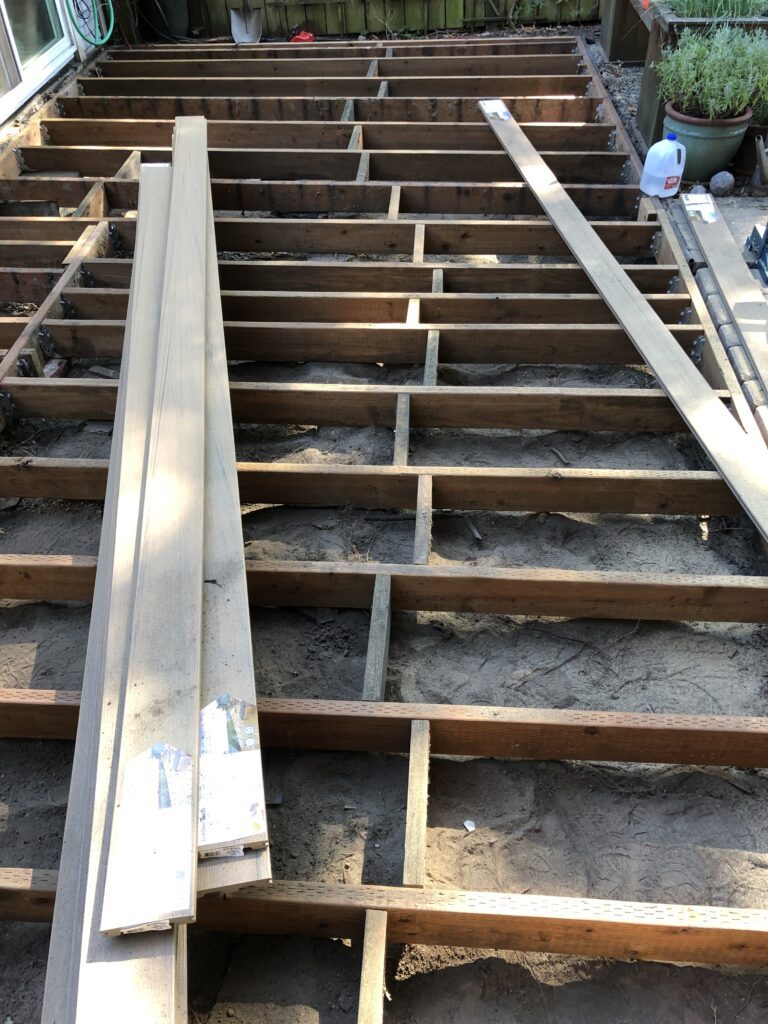
With soil removed and concrete footings, 2×6 pressure treated boards were used as joists for the substructure.
Blocking Boards
Short boards were added, bridging the space between the joists. This added much more stability to the deck.

Deck Border
Additional joists were installed to support a picture frame border around the deck. This helps hide the cut ends and creates a more finished look.
Installing a New Deck
Step 1: Planning and Design
- Set Your Budget: Determine how much you’re willing to invest in your new deck. This will influence the materials and design choices you make.
- Choose Your Materials: Consider the pros and cons of different decking materials, such as pressure-treated wood, composite, cedar, or tropical hardwoods. Each material offers distinct aesthetics, durability, and maintenance requirements.
- Design Your Dream Deck: Envision the layout, size, and features of your new deck. Think about how you’ll use the space – for dining, lounging, or entertaining – and design accordingly.
Step 2: Demolition and Removal
- Safety First: Ensure safety during demolition. Use appropriate safety gear and work cautiously to remove the old deck boards and structural components.
- Dispose of the Old Materials: Arrange for the disposal of the old, rotting deck materials. This can involve renting a dumpster or coordinating with a waste removal service.
Step 3: Building the New Deck
- Laying the Foundation: A solid foundation is essential. Check or replace any rot-damaged support posts or beams. Consider the use of concrete footings for added stability.
- Decking Material Installation: Install your chosen decking material according to the manufacturer’s recommendations. Be meticulous with spacing, fasteners, and supports to ensure a level and secure deck surface.
Step 4: Finishing Touches
- Railing and Balusters: Replace or install a new railing system that complements your deck’s aesthetics and provides safety.
- Stairs and Landings: If your deck features stairs, construct or renovate them for safe and easy access.
- Sealing and Staining: Protect your new deck by applying a suitable sealer or stain. This step is essential for preserving the wood or composite material and enhancing its longevity.

Composite Decking
The decking was cut in 4 and 8 feet sections and alternated to give a more interesting design.

Deck Skirting
Heavy duty wire mesh was stapled onto the side of the deck to help keep small animals from burrowing under.

Concrete Border
A layer of concrete pavers was then placed on the side over the mesh to help keep soil away from the substructure.
Decking Materials
The choice of decking material should take into consideration factors like your budget, climate, maintenance preferences, and aesthetic preferences. What works best for one person may not be the ideal choice for another. Carefully evaluate the pros and cons of each material and select the one that best fits your needs and the specific requirements of your outdoor space.
Pressure-treated wood is the most common and affordable decking material. It is natural wood that has been treated with chemicals to enhance its resistance to decay and insects.
- Pros: Affordable, widely available, easy to work with, can be stained or painted, natural appearance.
- Cons: Requires regular maintenance (staining or sealing), can splinter, susceptible to rot and insects over time.
Cedar and redwood are both softwood options known for their natural resistance to decay and insects. They offer a rich, attractive appearance.
- Pros: Naturally resistant to decay and insects, attractive natural appearance, doesn’t require staining or sealing.
- Cons: More expensive than treated wood, may still require periodic maintenance, limited availability in some regions.
Composite decking is a man-made material typically composed of a mix of wood fibers, plastic, and bonding agents. It’s designed to mimic the look of wood while offering increased durability and low maintenance.
- Pros: Low maintenance, resistant to rot, insects, and fading, available in various colors and styles, eco-friendly options made from recycled materials.
- Cons: Initial cost is higher than wood, some composite materials can become hot in direct sun, can be prone to mold and mildew (though many newer composites resist this), can’t be refinished or stained.

